After the original text has been carefully removed from a manga page – a process we call "cleaning" – you're often left with blank spaces. These gaps, previously occupied by dialogue or narration, need to be seamlessly filled so that new translated text can be added without looking awkward or out of place. This crucial stage in scanlation is known as **redrawing** or, more specifically in the digital realm, **inpainting**.
What is Redrawing/Inpainting?
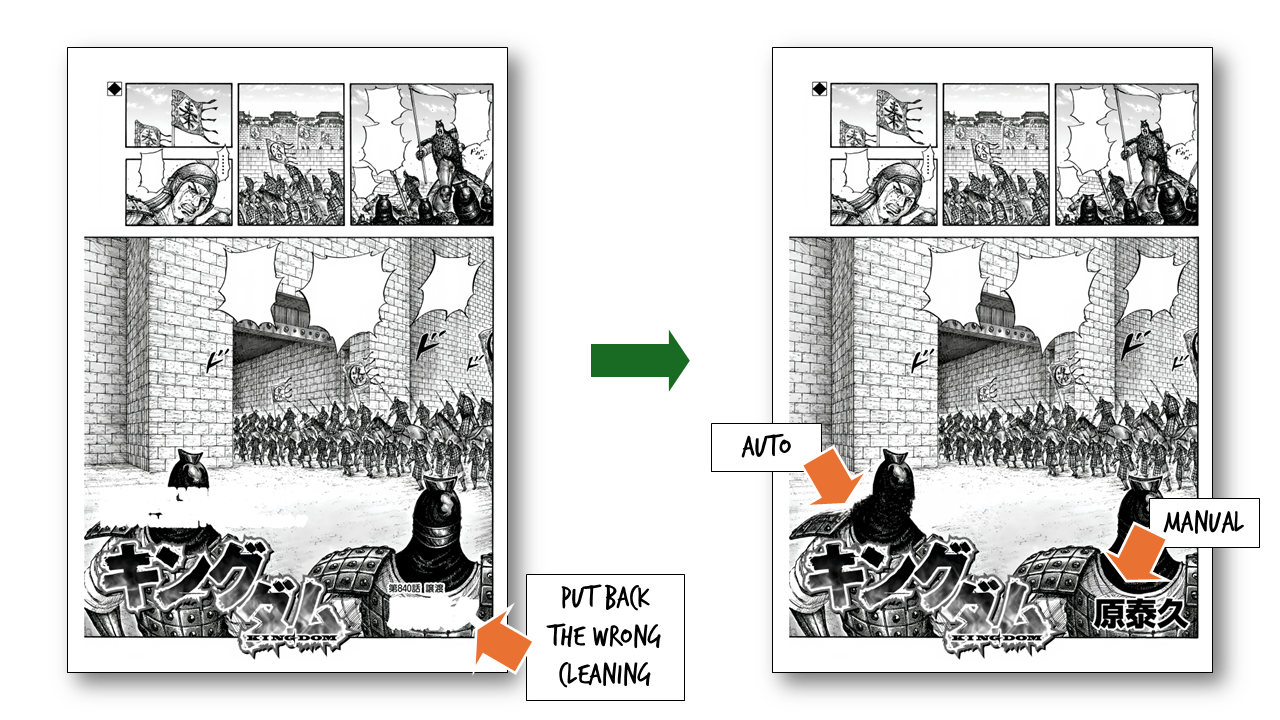
Redrawing, in its broader sense, refers to the act of recreating or filling in missing parts of the manga artwork. When original text is removed, it often obscures parts of the background, character art, or panel lines. Redrawing is the process of intelligently inferring and reconstructing what was behind that text, making the panel look as if the text was never there.
In the digital age, this is largely accomplished through **inpainting**, which utilizes algorithms (often powered by Artificial Intelligence) to generate realistic textures and details in the masked-out areas, blending them seamlessly with the surrounding artwork. The goal is to make the removed text utterly vanish, leaving a pristine canvas for translation.
The Tool: IOPaint for Advanced Inpainting
While some cleaning tools offer basic inpainting, as discussed in the previous article, we prefer a dedicated and more powerful solution for this complex task. Our tool of choice is **IOPaint**.
IOPaint, an open-source project available on GitHub (https://github.com/Sanster/IOPaint), is a versatile image inpainting tool that offers both automated and manual capabilities. It's built upon advanced AI models, allowing for highly convincing reconstruction of missing image areas.
Automated Inpainting: The Python Script
For large batches of pages or when the masked areas are relatively simple, we utilize IOPaint's capabilities programmatically via a Python script. This allows for efficient, high-volume processing.
Here's a cleaned-up version of the Python code we use for automated inpainting, along with an explanation:
import json
import os
from pathlib import Path
from typing import Optional

import cv2 # OpenCV for image processing
import numpy as np # Numerical operations, especially for image arrays
from PIL import Image # Pillow for image loading/saving
from loguru import logger # For logging messages
from rich.console import Console
from rich.progress import ( # For displaying progress in the console
    Progress,
    SpinnerColumn,
    TimeElapsedColumn,
    TextColumn,
)

# Internal IOPaint helper functions (assuming these are available in your IOPaint environment)
from iopaint.helper import pil_to_bytes
from iopaint.model.utils import torch_gc
from iopaint.model_manager import ModelManager
from iopaint.schema import InpaintRequest

def single_inpaint(
    image_path: Path,
    mask_path: Path,
    output_path: Path,
    config_path: Optional[Path] = None,
    concat_output: bool = False,
    model_name: str = 'lama',
    device_type: str = 'cuda',
):
    """
    Performs a single inpainting operation using IOPaint's model.

    Args:
        image_path (Path): Path to the original image.
        mask_path (Path): Path to the mask image (where white indicates areas to inpaint).
        output_path (Path): Path to save the inpainted image.
        config_path (Optional[Path]): Optional path to a JSON configuration file for inpainting.
        concat_output (bool): If True, concatenates original, mask, and inpainted images side-by-side.
        model_name (str): The inpainting model to use (e.g., 'lama').
        device_type (str): The computational device ('cuda' for GPU, 'cpu' for CPU).
    """
    if not image_path.is_file():
        logger.error(f"Invalid --image: image path '{image_path}' should be a file.")
        exit(-1)
    if not mask_path.is_file():
        logger.error(f"Invalid --mask: mask path '{mask_path}' should be a file.")
        exit(-1)

    # Load inpainting configuration
    if config_path is None:
        inpaint_request = InpaintRequest() # Use default request parameters
        logger.info(f"Using default inpaint config: {inpaint_request}")
    else:
        with open(config_path, "r", encoding="utf-8") as f:
            inpaint_request = InpaintRequest(**json.load(f)) # Load from JSON file
        logger.info(f"Using custom inpaint config: {inpaint_request}")

    # Initialize IOPaint Model Manager
    model_manager = ModelManager(name=model_name, device=device_type)
    console = Console()

    with Progress( # Setup a progress bar for console output
        SpinnerColumn(),
        TextColumn("[progress.description]{task.description}"),
        TimeElapsedColumn(),
        console=console,
        transient=True,
    ) as progress:
        task = progress.add_task("Processing image...", total=1)

        # Load images and convert to appropriate formats
        original_img_pil = Image.open(image_path)
        img = np.array(original_img_pil.convert("RGB")) # Convert to NumPy array, RGB
        mask_img = np.array(Image.open(mask_path).convert("L")) # Load mask as grayscale

        # Ensure mask matches image dimensions
        if mask_img.shape[:2] != img.shape[:2]:
            progress.log(
                f"Resizing mask {mask_path.name} to image {image_path.name} size: {img.shape[:2]}"
            )
            mask_img = cv2.resize(
                mask_img,
                (img.shape[1], img.shape[0]),
                interpolation=cv2.INTER_NEAREST, # Use nearest neighbor for masks to preserve sharp edges
            )
        # Binarize mask (ensure it's strictly 0 or 255)
        mask_img[mask_img >= 127] = 255
        mask_img[mask_img < 127] = 0

        # Perform the inpainting operation (returns BGR format)
        inpaint_result_bgr = model_manager(img, mask_img, inpaint_request)
        inpaint_result_rgb = cv2.cvtColor(inpaint_result_bgr, cv2.COLOR_BGR2RGB) # Convert back to RGB

        # Optional: Concatenate original, mask, and result for visual debugging
        if concat_output:
            mask_img_rgb = cv2.cvtColor(mask_img, cv2.COLOR_GRAY2RGB)
            inpaint_result_rgb = cv2.hconcat([img, mask_img_rgb, inpaint_result_rgb])

        # Save the inpainted image
        img_bytes = pil_to_bytes(Image.fromarray(inpaint_result_rgb), "png", 100, original_img_pil.info)
        with open(output_path, "wb") as fw:
            fw.write(img_bytes)

        progress.update(task, advance=1)
        torch_gc() # Clean up GPU memory

def expand_mask(mask_input_path: Path, expand_pixels: int, output_path: Path):
    """
    Expands (dilates) a binary mask by a specified number of pixels.
    Useful for ensuring the inpainting model covers slightly beyond the detected text.

    Args:
        mask_input_path (Path): Path to the original mask image.
        expand_pixels (int): Number of pixels to expand the mask by.
        output_path (Path): Path to save the expanded mask.
    """
    # Load the mask image as grayscale
    mask = cv2.imread(str(mask_input_path), cv2.IMREAD_GRAYSCALE)

    # Ensure the mask is binary (0 or 255)
    mask = cv2.threshold(mask, 127, 255, cv2.THRESH_BINARY)[1]

    # Define a kernel for dilation based on the expansion size
    # A kernel of size (N, N) will expand the mask by roughly N/2 pixels in each direction
    kernel = np.ones((expand_pixels, expand_pixels), np.uint8)

    # Perform dilation
    expanded_mask = cv2.dilate(mask, kernel, iterations=1)

    # Save the expanded mask
    cv2.imwrite(str(output_path), expanded_mask)

def main():
    """
    Example workflow for combining mask expansion and single image inpainting.
    """
    image_name = "01" # Base name for your image files

    # Define paths for mask, expanded mask, original image, and output
    base_dir = Path("E:/Downloads/output/") # Adjust this to your base output directory

    mask_source_path = base_dir / "masked" / f"{image_name}_mask.png"
    expanded_mask_path = base_dir / "masked" / f"{image_name}_mask_expanded.png"
    cleaned_image_path = base_dir / "cleaned" / f"{image_name}_clean.png"
    inpainted_output_path = base_dir / "cleaned_inpaint" / f"{image_name}_clean.png"

    # Ensure output directory exists
    inpainted_output_path.parent.mkdir(parents=True, exist_ok=True)

    # Step 1: Expand the mask
    # A value of N=10 will expand the mask by a few pixels, helping cover edge artifacts
    expand_mask(mask_source_path, N=10, output_path=expanded_mask_path)

    # Step 2: Perform automated inpainting
    single_inpaint(
        model_name="lama",
        device_type="cuda", # Use "cpu" if you don't have a CUDA-compatible GPU
        image_path=cleaned_image_path,
        mask_path=expanded_mask_path, # Use the expanded mask
        output_path=inpainted_output_path,
        # config_path=Path("path/to/custom_config.json"), # Uncomment and set if you have a custom config
        concat_output=False # Set to True to see original, mask, and result side-by-side
    )

if __name__ == "__main__":
    main()
Manual Inpainting: When Precision Matters
While automated inpainting is excellent for efficiency, there are always those tricky cases where a model might struggle. This could be due to:
- Complex Backgrounds: Highly detailed or intricate artwork behind the text that's difficult for AI to perfectly reconstruct.
- PanelCleaner Misses: Sometimes, the initial cleaning step might not have perfectly masked all parts of the original text, leaving faint traces.
- Artistic Discrepancies: Instances where the AI's generated content doesn't quite match the original artist's style or intent.
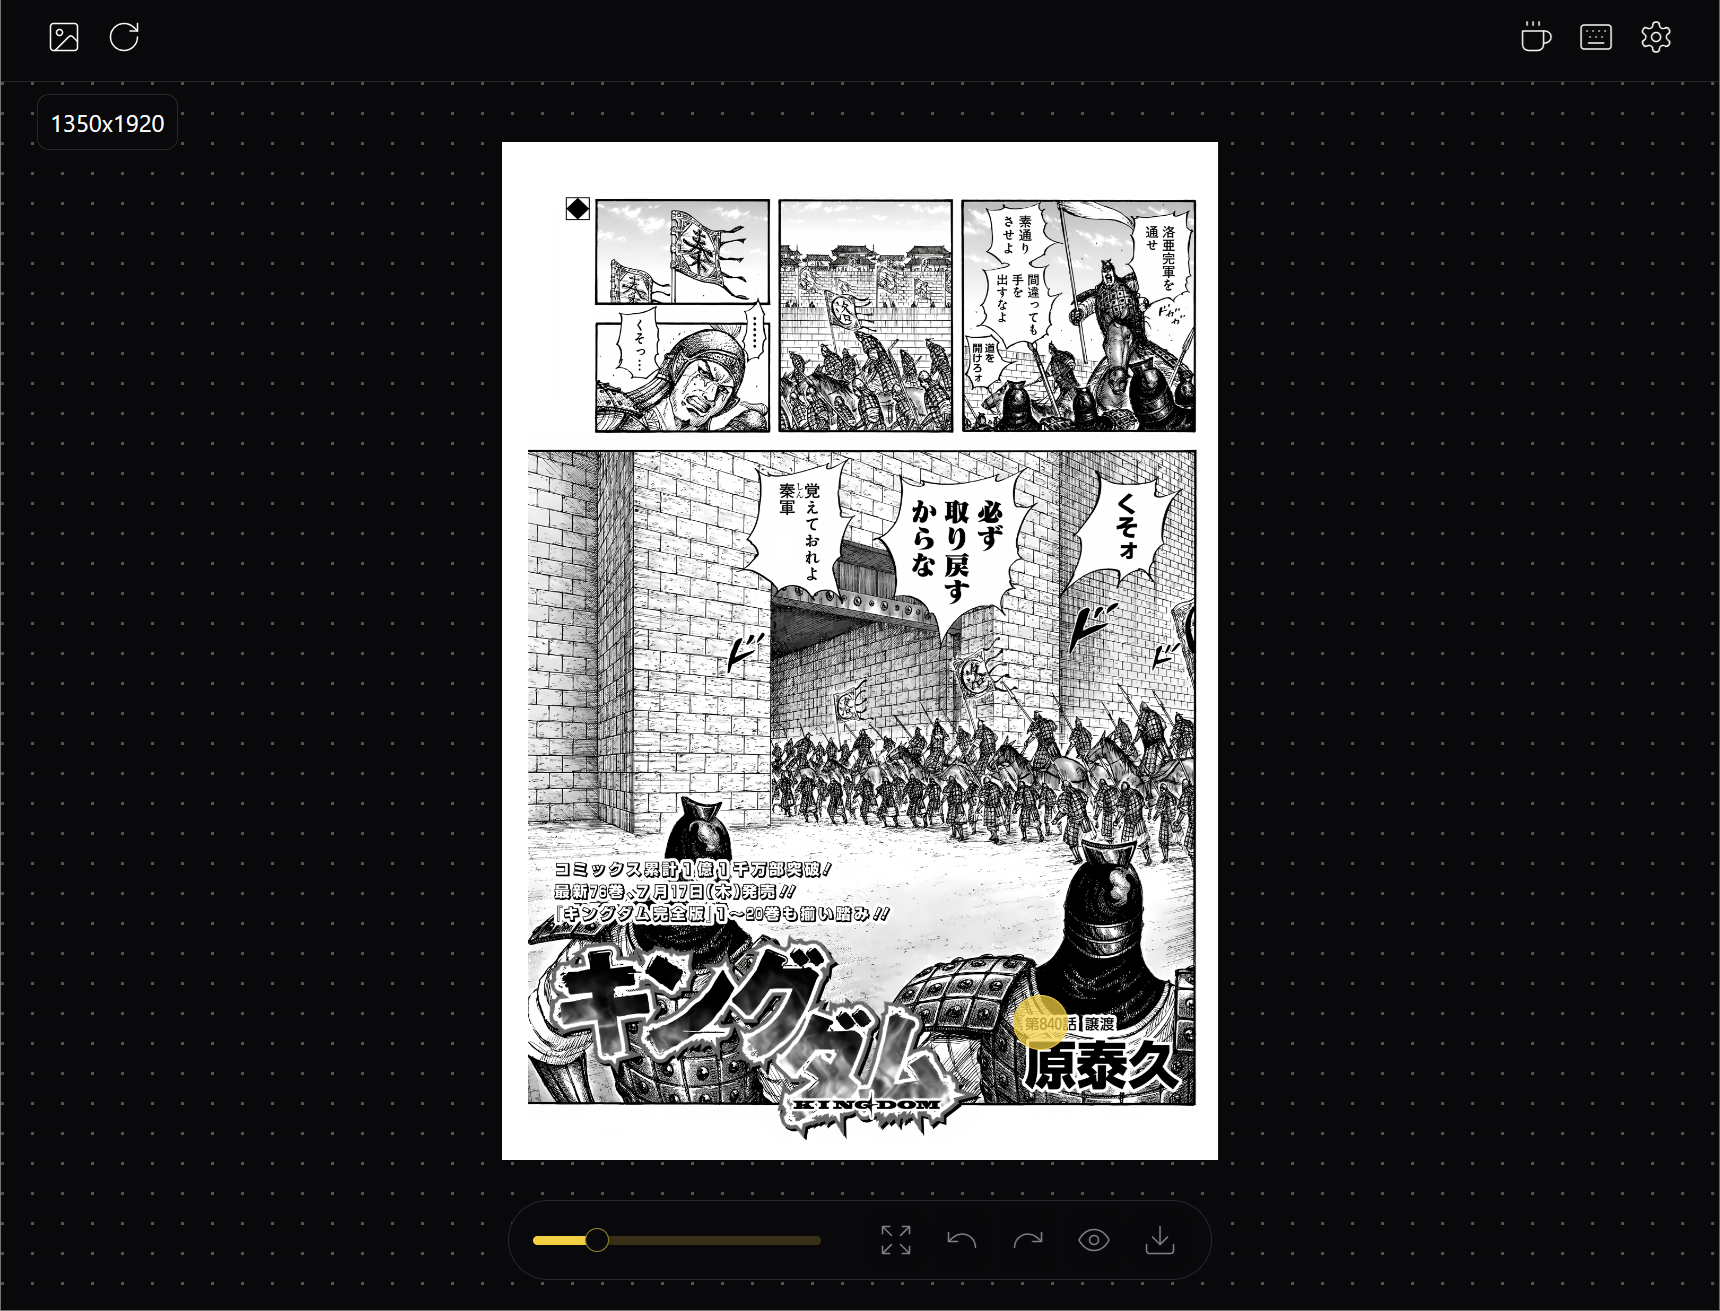
For these scenarios, IOPaint provides a user-friendly Graphical User Interface (GUI) for manual inpainting. This allows a human editor to precisely control the masked areas and review the inpainting results in real-time.
To start the IOPaint GUI, you simply run the following command in your terminal:
iopaint start --model=lama --device=cpu --port=8080This command launches a web-based interface (typically accessible at `http://localhost:8080`) where you can upload your image and its corresponding mask, then use brushes to refine the masked areas or manually trigger inpainting for specific regions. The `--model` flag specifies the inpainting model (e.g., `lama`), `--device` selects your computing device (use `cuda` if you have an NVIDIA GPU for faster processing, otherwise `cpu`), and `--port` defines the port for the web interface.

Before vs. After Inpainting: The Transformation
The result of a successful inpainting process is often quite astonishing. What was once a glaring white void (after cleaning) or an area obscured by text becomes a seamless extension of the original artwork. This step is critical for maintaining the visual integrity and immersion of the manga.

Conclusion
Redrawing, or inpainting, stands as a testament to the blend of technology and artistry in scanlation. By leveraging powerful AI tools like IOPaint, both programmatically and manually, scanlators can meticulously reconstruct obscured artwork, turning what would otherwise be jarring empty spaces into integral parts of the original panel. This "invisible art" ensures that the reader's experience is smooth and immersive, preparing the way for the final, visible layer of translated text.